
丨版权说明 : 《Android Handler机制简单分析》于当前CSDN博客和乘月网属同一原创,转载请说明出处,谢谢。
本文一切从简,将围绕以下流程展开叙述:
graph LR
A["what"]-->B["why"]
B["why"]-->C["how"]
C["how"]-->D["analyze"]
what?
接触Android的朋友都知道Handler机制用于多线程方面的通信,这好像是一句废话。
why?
我们知道java几个具有代表性的多线程通信方法,例如:
-
"wait"和"notify"通知机制
Java中每个类都是Oject的子类(万物皆对象,滑稽~~),也就具备Oject的"wait()"和"notify()"方法特性。简单举例说明:两个线程中,对于某类的对象a,在线程1中执行a.wait(),线程1则一直处于阻塞中,直到在线程2中执行a.notify(),线程1才被唤醒继续执行。 -
"synchronized"线程锁机制
多个线程共享一个变量,通过上锁( synchronized关键字 )限制线程们对该变量的访问,谁拿到锁,谁便可以对变量进行修改,待其他线程拿到锁访问该变量时,根据变量的变化作出相应的处理,以达到通信的目的。 -
此处省略n个字...
嗯,上述方法都是利用线程 `阻塞` 的方式进行通信。这若在Android中使用?你得先搞清楚3个问题:
-
Android中多线程通信是为UI线程(主线程)+Worker线程(子线程)的交互服务的。
-
基于问题1,Android的UI线程不允许阻塞,否则会造成"ANR"( 想了解ANR? 传送门)
-
基于问题2,为避免"ANR",Android中所有的耗时操作(如网络请求,文件读写)须在子线程中完成,并通知进度或结果给主线程用于UI更新。
综上:
既然java原生方法无法满足Android程序设计方面的要求,那只能另辟新径了。还好google比较良心,自己挖“坑”自己补,于是设计了一系列UI线程与Worker线程通信的方法,如:
- activity.runOnUiThread(Runable action)(Activity类下的切换回UI线程的方法)
- view.post(Runable action),view.postDelayed(Runnable action, long delayMillis)(View类下的切换回UI线程的方法)
- 还有本文的主角Handler机制(异步消息处理机制)等等。
how?
先来一段Demo:
......
public class MainActivity extends AppCompatActivity {

    private static final int MSG_DOWNLOAD_TASK = 1;
    private TextView tv_progress;

    @Override
    protected void onCreate(Bundle savedInstanceState) {
        super.onCreate(savedInstanceState);
        setContentView(R.layout.activity_main);
        tv_progress = findViewById(R.id.tv_progress);
    }

    private Handler mHandler = new Handler() {
        @Override
        public void handleMessage(Message msg) {
            super.handleMessage(msg);
            switch (msg.what) {
                case MSG_DOWNLOAD_TASK:
                    int progress = (int) msg.obj;
                    tv_progress.setText(progress + "");
                    break;
            }
        }
    };

    /**
     * UI上的Button按钮点击事件
     * 模拟执行下载任务
     *
     * @param view
     */
    private void download(View view) {
        new Thread(new Runnable() {
            @Override
            public void run() {
                int progress = 0;
                try {
                    while (progress >= 100) {
                        Message msg = Message.obtain();
                        msg.what = MSG_DOWNLOAD_TASK;
                        msg.obj = progress;
                        mHandler.sendMessage(msg);

                        /**
                         * 模拟下载进度回调中...
                         */
                        Thread.sleep(1000);
                        progress++;
                    }
                } catch (InterruptedException e) {
                    e.printStackTrace();
                }
            }
        }).start();
    }
}
上述demo便是Handler的简单用法,希望大家能看懂。为了简练代码,请忽略内存泄漏~~~
analyze
好了,知道怎么用了,接下来就得知道为什么这样写可以切换到主线程,这就麻烦了,得看源码!!!
怎么看?直接通过demo看:
1.`mHandler = new Handler() {... }`初始化Handler
- 来,我们来看看Handler构造方法在干嘛:
>>> 下文所有源码均源于Android8.0,为了简练,只保留核心代码 <<<

    public Handler() {
        this(null, false);//走的是下面的双参构造方法
    }

    public Handler(Callback callback, boolean async) {
    ......
        mLooper = Looper.myLooper();//把当前线程中Looper对象引用交给Handler
        if (mLooper == null) {
            throw new RuntimeException(
                "Can't create handler inside thread that has not called Looper.prepare()");
                //不能在此线程中创建handler,因为还没有调用过Looper.prepare()
        }
        mQueue = mLooper.mQueue;//从Looper对象取出MessageQueue对象给Handler
        mCallback = callback;//null值
        mAsynchronous = async;//false
    }
上述代码,我特意把抛异常的说明翻译了一下,Excuse me?我并没有执行啊,怎么没报异常?怎么 Looper.myLooper() 有值的啊?
其实这并不矛盾,在同一个线程中可以创建一个或多个Handler对象,但前提必须是 当前线程 已创建(通过Looper.prepare()创建)并保存或已存在唯一的Looper对象(不理解没关系,不了解Looper也没有关系,下文会继续说),Android所有线程之间的通信皆如此,主线程亦然。
Android中,app运行入口是在ActivityThread类里的main函数开始的,没错,你没看错,就是java程序的入口main函数,android app也是java写的,当然也是main入口的,那么我们直接看核心源码来解释上面的疑问:
......
public final class ActivityThread {
    ......
    public static void main(String[] args) {//app程序入口
        ......
        //1.其实本质还是走Looper.prepare(),见下面Looper类相关代码便知
        Looper.prepareMainLooper();
        ......
        if (sMainThreadHandler == null) {
            //2.获取的是Handle子类H对象引用,在H中添加了处理各种消息的业务(不理解没关系,反正就是创建个Handler子类的对象)
            sMainThreadHandler = thread.getHandler();
        }
        ......
        //3.轮询消息
        Looper.loop();

        throw new RuntimeException("Main thread loop unexpectedly exited");
    }
}- Looper类下相关代码:
......
public final class Looper {
......
    public static void prepareMainLooper() {
       //带参的Looper.prepare(quitAllowed)方法
        prepare(false);
        synchronized (Looper.class) {
            if (sMainLooper != null) {

                throw new IllegalStateException("The main Looper has already been prepared.");
                //已存在Looper对象了,不要再创建了
            }
            sMainLooper = myLooper();
        }
    }

    private static void prepare(boolean quitAllowed) {
        if (sThreadLocal.get() != null) {

            throw new RuntimeException("Only one Looper may be created per thread");
            //每个线程只能创建一个Looper对象,其实还是在说已存在Looper对象了,不要再创建了
        }
        //这里创建了久违的Looper对象
        sThreadLocal.set(new Looper(quitAllowed));
    }

--------------顺便看看Looper.prepare()在干什么--------------------

    public static void prepare() {
        /**
         *本质是走上面的带参的prepare(quitAllowed)方法
         *不要太在意quitAllowed参数,反正是传给Looper对象用的
         */
        prepare(true);
    }
}

--------------再来看Looper的初始化--------------------

    private Looper(boolean quitAllowed) {
        mQueue = new MessageQueue(quitAllowed);//传说中的MessageQueue(消息队列)对象是在这里创建的
        mThread = Thread.currentThread();//获取当前线程对象
    }
小结:
- 由于是app程序入口,main函数一定执行在主线程(UI线程)上,并且程序一开始就为主线程创建并保存好了Looper对象,以便为Handler子类H提供服务,既然已存在,当然不需要自行“Looper.prepare()”了。
- Android官方已经为我们提供了Handler机制代码模版↓↓↓
graph LR
     A["1. 创建Looper对象"]-->B["2. 创建Handler对象"]
     B-->C["3. 执行loop()消息轮询"]
逻辑代码写法流程图:
graph TD
    A["当前线程执行“Looper.prepare(...)”开始搞事情"]-->B["new Handler(...)"]
    B-->C{"创建若干线程"}
    C-->D["线程1"]
    C-->E["线程2"]
    C-->F["线程xxx"]
    D-->G("执行异步逻辑,通过Handler对象发送消息")
    E-->G
    F-->G
G-->H["执行“Looper.loop()”"]所以,可以这样归纳:主线程与子线程间通信不需要写Looper.prepare(...)和Looper.loop(),子线程与主线程以及子线程与子线程间的通信则需要。
- MessageQueue(消息队列)对象是在Looper初始化的时候被创建,且一个线程中仅能创建一个Looper对象,所以一个线程中MessageQueue与Looper对象是一对一的关系。
2. `Message msg = Message.obtain();`子线程中发消息前创建Message对象
- 先简单分析下`Message.obtain()`源码:
    /**
     * Return a new Message instance from the global pool. Allows us to
     * avoid allocating new objects in many cases.
     *个人翻译:从全局池返回一个新Message实例(可能是新创建的,也可能是从全局池中重新复用的)。
     *允许我们在多数情况下避免分配(创建)过多的新对象
     */
    public static Message obtain() {
        synchronized (sPoolSync) {//同步锁访问机制
            if (sPool != null) {//池不为null,复用已存在的对象
                Message m = sPool;//从池中取出Message对象(很明显这个池也是Message类的对象)
                sPool = m.next;
                /**
                 *结合上面可以知道这个池其实是由多个Message对象组成的链表结构(不知道链表?找度娘...)
                 *每次复用的都是表头的Message对象
                 *表头被取走(复用)后,紧连着表头的另一个Message对象成为新的表头,以此类推
                 *先不要想这个链表是怎么添加Message对象的,也不要着急看Message类全部源码,因为不是本文重点
                 */
                m.next = null;//对即将复用的表头(Message对象)进行脱链,从此自由啦!
                m.flags = 0; //clear in-use flag (清除“在使用中的”的标记,恢复初始状态以便复用)
                sPoolSize--;//复用后,链表长度减1
                return m;//返回表头(复用表头)
            }
        }
        return new Message();//池为null时直接创建新Message对象
}- 下面介绍Message的flags属性:
    /**
     * If set message is in use.
     * This flag is set when the message is enqueued and remains set while it
     * is delivered and afterwards when it is recycled.  The flag is only cleared
     * when a new message is created or obtained since that is the only time that
     * applications are allowed to modify the contents of the message.
     *
     * It is an error to attempt to enqueue or recycle a message that is already in use.
     *
     *个人翻译:这个值表示message在使用中(即:flags=FLAG_IN_USE=1,不是赋值号!!!)。当消息排队时设
     *置为该标志(设置为"使用中"状态),并且在传送消息过程中保持该状态,直到之后被回收。
     *只有在新创建(“new Message()”)或获取(“Message.obtain()”)一个消息时才会清除该标志,
     *这是允许应用程序修改消息内容的唯一时间。
     *
     *当某消息处于使用中状态时,尝试去排队或回收该消息是错误的。
     *
     *1 << 0还是等于1,不知道谷歌为啥在很多源码中都有这种骚操作,如果你知道请下方留言告知,万分感谢!
     */
    /*package*/ static final int FLAG_IN_USE = 1 << 0;

    //使用状态标识,默认为0,即为未使用
/*package*/ int flags;- 再看`new Message()`构造方法源码:
    /**
     * Constructor (but the preferred way to get a Message is to call {@link #obtain() Message.obtain()}).
     * 个人翻译:构造器(但是推荐的方式是调用"Message.obtain()")
     */
    public Message() {
    }
嗯哼,如此简单明了的告诉你:其实我的构造方法没啥骚操作,但希望你优先使用Message.obtain()方式获取Message实例,避免铺张浪费。
小结:
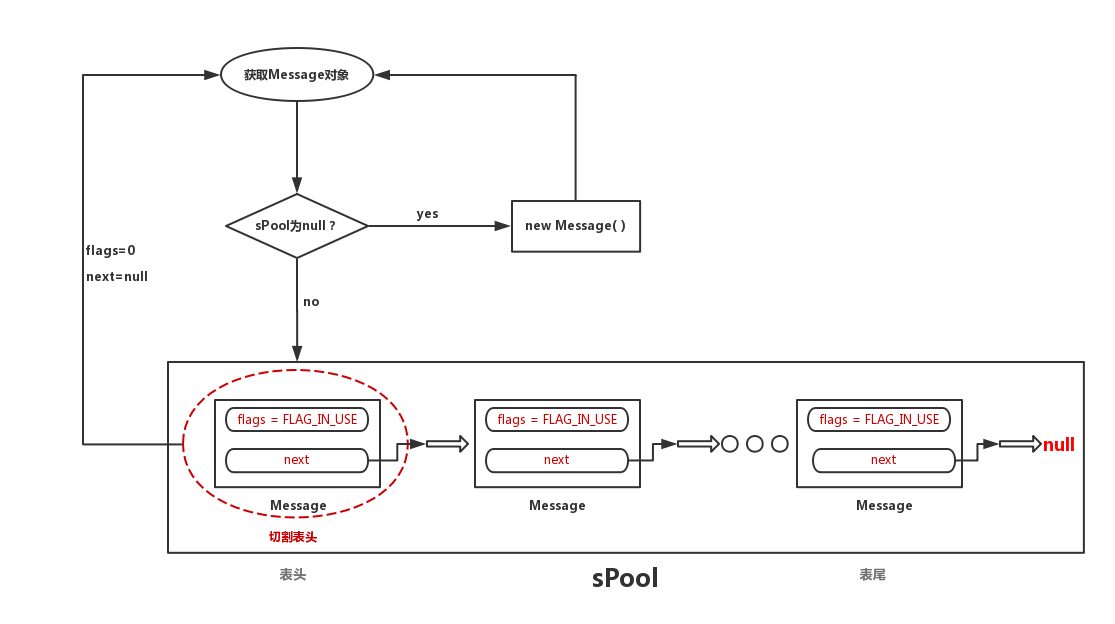
关于Message对象的获取,优先考虑全局池(Message链表),有则取表头并作脱链(next= null)和清除"in use"状态(flags=0)的重置操作,无则“new”一个新对象,此时其flags默认值为0,next为null。这与上述翻译的“清除‘in use’状态的唯一时间”相对应。
下面是获取Message对象流程图
3.`msg.what = MSG_DOWNLOAD_TASK......mHandler.sendMessage(msg);`发送消息
- 其实对于Message的what和obj用法大家应该很熟悉了,这里就顺便看一下源码的解释:
......
    /**
     * User-defined message code so that the recipient can identify
     * what this message is about. Each {@link Handler} has its own name-space
     * for message codes, so you do not need to worry about yours conflicting
     * with other handlers.
     *个人翻译:用户自定义的消息码,便于接收者(Handler)识别是关于什么的消息。
     *每个Handler都有自己消息码命名空间,所以你不用担心与其他Handler冲突
     *个人解释:这是一个消息标识,随便你怎么定义这个消息码的值,不用担心因与其他Handler
     *的Message消息码相同而冲突,因为Message对象由哪个handler对象发送,就由哪个handler
     *的handleMessage方法接收该消息(不明白?继续看下文)
     */
    public int what;

    /**
     * An arbitrary object to send to the recipient.  When using
     * {@link Messenger} to send the message across processes this can only
     * be non-null if it contains a Parcelable of a framework class (not one
     * implemented by the application).   For other data transfer use
     * {@link #setData}.
     *
     * Note that Parcelable objects here are not supported prior to
     * the {@link android.os.Build.VERSION_CODES#FROYO} release.
     *个人翻译:一个任意对象发送给接收者。如果它是Parcelable实现类,使用Messenger
     *跨进程(注意是"跨进程"哦)发送消息,只能是非空的。其它数据使用setData方法传输
     *个人解释:可以传递是任何Object类型对象,对于Messenger跨进程不是本文重点,请忽略。对于setData
     *方法,方法全名为setData(Bundle data),表示可以传一个Bundle类型数据消息
     */
    public Object obj;

......- 接下来再回看Handler源码:
......
     /**
     * Pushes a message onto the end of the message queue after all pending messages
     * before the current time. It will be received in {@link #handleMessage},
     * in the thread attached to this handler.
     * 个人翻译:推送一条消息到消息队列,在所有此前处于等待中的消息之后排队等待接收。这个消息
     *将由绑定于当前handler对象的线程中被其handleMessage方法接收。
     *个人解释:当前时间发送的消息,会按先来后到的顺序排队等待被handler的handleMessage
     *方法在handler被创建的线程中接收,好像还是很茫然哈,很正常,往后面看几段你就明白了)
     *
     * @return Returns true if the message was successfully placed in to the
     *         message queue.  Returns false on failure, usually because the
     *         looper processing the message queue is exiting.
     个人翻译:如果成功放入消息队列返回true,如果失败返回false,通常是这个消息队列被轮询的looper
     *退出轮询导致的
     */
    public final boolean sendMessage(Message msg)
    {
        //走下面的方法。前面的方法介绍的很详细,下面的方法就简单介绍了
        return sendMessageDelayed(msg,0);
    }

    /**
     *顾名思义,就是延迟delayMillis毫秒后发送消息
     */
    public final boolean sendMessageDelayed(Message msg, long delayMillis)
    {
        if (delayMillis < 0) {
            delayMillis = 0;
        }
        /**
         *继续走下面的方法,“SystemClock.uptimeMillis()”表示从系统开机到现在的毫秒数,
         *类似于“System.currentTimeMillis()”,但不完全相同,这个不用纠结,反正就是表达“当前时间”。
         *那么“+ delayMillis”就是表示从当前时间开始向后延迟delayMillis毫秒
         */
        return sendMessageAtTime(msg, SystemClock.uptimeMillis() + delayMillis);
    }

    /**
     *同样顾名思义,在指定的时间点开始发送消息,即指定从系统开机时间到uptimeMillis毫秒时开始发送消息
     *贯穿上面的解释很好理解,如果uptimeMillis=SystemClock.uptimeMillis()就是从此时开始,
     *如果uptimeMillis=SystemClock.uptimeMillis()+delayMillis就是延后delayMillis毫秒开始。
     */
    public boolean sendMessageAtTime(Message msg, long uptimeMillis) {
        //通过上文可以知道这个消息队列对象“mQueue”是在Handler初始化时由looper对象赋值给handler的
        MessageQueue queue = mQueue;
        if (queue == null) {
            RuntimeException e = new RuntimeException(
                    this + " sendMessageAtTime() called with no mQueue");
            Log.w("Looper", e.getMessage(), e);
            return false;
        }
        //走下面的方法
        return enqueueMessage(queue, msg, uptimeMillis);
    }

    private boolean enqueueMessage(MessageQueue queue, Message msg, long uptimeMillis) {
        //当前Handler对象赋值给msg.target,小彩蛋:为了之后告诉looper自己(msg)是被哪个handler对象发送的
        msg.target = this;

        /**
         *是否为异步传输,这个会打乱排队顺序(那排队还有啥用?),所以不推荐使用
         *并且通过上文可知Handler初始化时默认mAsynchronous为false,所以这段代码请忽略
         */
        if (mAsynchronous) {
            msg.setAsynchronous(true);
        }
        //哎,没完没了了,继续走MessageQueue的enqueueMessage方法
        return queue.enqueueMessage(msg, uptimeMillis);
    }
......- 看MessageQueue源码:
......
    boolean enqueueMessage(Message msg, long when) {
        if (msg.target == null) {//结合上文可知msg.target不为null
            throw new IllegalArgumentException("Message must have a target.");
        }
        if (msg.isInUse()) {//判断Message是否为"in use"状态,结合上文可知为0,即非使用状态
            throw new IllegalStateException(msg + " This message is already in use.");
        }

        synchronized (this) {
            if (mQuitting) {//mQuitting默认为false,只有调用quit()方法才会为true,先不考虑这里
                IllegalStateException e = new IllegalStateException(
                        msg.target + " sending message to a Handler on a dead thread");
                Log.w(TAG, e.getMessage(), e);
                msg.recycle();//没错,这里就是Message回收到sPool的方法,不是本文重点,有兴趣的可以看下
                return false;//还记得sendMessage上的翻译么?"通常是这个消息...导致的"。说的就是这里
            }

            msg.markInUse();//msg.flags设为FLAG_IN_USE,即进入使用中状态
            msg.when = when;
            /**
             *这个mMessages便是真正的消息队列实现者,其本质跟sPool一样都是Message链表,
             *且表头也是优先级最高的,mMessages默认不会初始化,即mMessages==null
             */
            Message p = mMessages;
            boolean needWake;
            if (p == null || when == 0 || when < p.when) {
                // New head, wake up the event queue if blocked.
                //新的表头,如果阻塞,唤醒事件队列。
                /**
                 *新的表头?三个任意条件:mMessages==null,即队列还不存在,当前来排队的msg有幸成为
                 *第一个排队的,当然是表头;when == 0,刚开机就发消息?优先级很高啊,当然放在表头
                 *(虽然不太现实);when < p.when,比链表的表头时间还小,肯定优先发送,当然要放在表
                 头。
                 */
                msg.next = p;
                mMessages = msg;//msg正式成为表头
                ......
            } else {
                ......

                /**
                 *重新组构链表,先按时间从小到大的顺序排列,如果遇到时间点相同的msg则继续按先来
                 *后到的顺序排列
                 *小插曲:"先来后到"?是不是觉得很眼熟?上文"sendMessage"注释表达的意思就是下方代
                 *码的最终实现逻辑。
                 */
                   Message prev;
                for (;;) {//从头到尾地拆链表,为寻找msg合适的插入位置
                    prev = p;
                    p = p.next;//上下两句代码是在拆链
                    if (p == null || when < p.when) {
                    //p为null表示为表尾了,没必要继续拆了
                    //when < p.when表示当前msg已在排到最合适的位置了
                        break;
                    }
                    ......
                }
                msg.next = p; // invariant: p == prev.next
                prev.next = msg; //将msg插入链表中
            }

            ......
        }
        return true;
    }
......
小结:
因为handler发送消息最终走的是`sendMessageAtTime()`方法,所以`enqueueMessage()`方法下的`when`其实是指`时间点`。在若干线程中,任意时间发送多个消息,如果最终调用enqueueMessage时传入的when(即uptimeMillis
)值都相同,则它们被接收(处理)的`时间点相同`。上文谷歌在`sendMessage()`的注释中提到"当前时间"是指调用sendMessage时,传入的when,即"SystemClock.uptimeMillis() + delayMillis"与消息队列中已有的某些`msg`的`when`值相同,需要按先来后到的顺序排到这些msg的最后。
下面是消息队列示意图:

嗯哼,既然排好队了,那是不是就等着Looper来轮询了?Demo没有给出轮询代码,因为UI线程为我们写好了,你懂的。 <font color=red> 接下来看`analyze`收尾篇↓↓↓</font>
4.`Looper.loop();`轮询消息
- 看 "Looper.loop()" 源码:
......
    /**
     * Run the message queue in this thread. Be sure to call
     * {@link #quit()} to end the loop.
     *个人翻译:在此线程中运行消息队列。 请务必调用 quit( )方法以结束循环。
     */
    public static void loop() {
        final Looper me = myLooper();
        if (me == null) {
            throw new RuntimeException("No Looper; Looper.prepare() wasn't called on this thread.");
            //没有Looper对象;"Looper.prepare()"未在此线程中调用。
            //这个不用多说了吧?
        }
        final MessageQueue queue = me.mQueue;//获取MessageQueue对象
        ......
        for (;;) {//轮询
            //1.从消息队列里取消息
            Message msg = queue.next(); // might block 可能会阻塞
            if (msg == null) {
                // No message indicates that the message queue is quitting.
                //没有消息表明消息队列正在退出。
                return;//退出轮询
            }

            ......
            try {
                msg.target.dispatchMessage(msg);//2.分发消息(交由与之关联的handler接收处理)
                ......
            } finally {
                ......
            }
            ......
            msg.recycleUnchecked();//3.消息处理结束,直接回收到全局池sPool
        }
    }
......- 看看 "queue.next()" 获取消息流程:
    Message next() {
        ......
        /**
         * 线程阻塞的时间
         *-1:一直阻塞,直到线程被唤醒为止。如果期间有程序唤醒线程会立即向下执行。比如新消息进入队列触发唤醒
         * 0:不阻塞
         *>0: 最长阻塞nextPollTimeoutMillis毫秒。如果期间有程序唤醒线程会立即向下执行。比如新消息进入队列触发唤醒
         */
        int nextPollTimeoutMillis = 0;
        for (;;) {
            if (nextPollTimeoutMillis != 0) {//需要阻塞
                //在底层做好阻塞线程相关准备,主要是释放已挂起的对象
                Binder.flushPendingCommands();
            }
            //阻塞线程
            nativePollOnce(ptr, nextPollTimeoutMillis);

            synchronized (this) {
                //Try to retrieve the next message.Return if found.
                //尝试轮询下一条消息。 如果找到则返回。

                //当前时间
                final long now = SystemClock.uptimeMillis();
                Message prevMsg = null;
                Message msg = mMessages;

                ......//此处忽略了异步消息代码

                if (msg != null) {
                    if (now < msg.when) {
                        // Next message is not ready.  Set a timeout to wake up when it is ready.
                        //下一条消息没有准备好。 设置超时以在准备就绪时唤醒。
                        //消息接收处理的时间还没到,计算休眠时间,以便下次来判断此消息是否可以执行
                        nextPollTimeoutMillis = (int) Math.min(msg.when - now, Integer.MAX_VALUE);
                    } else {
                        // Got a message.
                        //获取一个msg
                        mBlocked = false;
                        if (prevMsg != null) {//不为null属于异步范围,本文不考虑
                            prevMsg.next = msg.next;
                        } else {
                            mMessages = msg.next;//对msg(表头)作脱链处理
                        }
                        msg.next = null;//msg彻底解放出来了
                        if (DEBUG) Log.v(TAG, "Returning message: " + msg);
                        msg.markInUse();//标记为使用中
                        return msg;//返回msg
                    }
                } else {
                    // No more messages.
                    //没有更多的消息了,让线程一直阻塞,直到线程被唤醒(一般有新消息进入队列会直接触发唤醒)
                    nextPollTimeoutMillis = -1;
                }
                // Process the quit message now that all pending messages have been handled.
                // 处理完所有待处理消息后,立即退出轮询。
                if (mQuitting) {//消息队列正在退出
                    dispose();//native底层注销和释放资源,完成退出
                    return null;
                }

                ......//此处忽略了执行IdleHandler代码
        }
}- 再看"msg.target.dispatchMessage(msg)"在干什么。<font color=red>高能预警↓↓↓</font>
    /**
     * Handle system messages here.
     *在这里处理系统消息。
     */
    public void dispatchMessage(Message msg) {

        if (msg.callback != null) {
            /**
             * callback!=null表示通过postXXX()方法发送的消息,不需要走handleMessage方法
             * 如:new Handler().postDelayed(Runnable r, long delayMillis);
             */
            handleCallback(msg);
        } else {
            /**mCallback!=null表示创建Handler时直接传入CallBack实现
             *类,直接调用CallBack的handleMessage方法就好了
             *如:new Handler(Callback callback);
             */
            if (mCallback != null) {
                if (mCallback.handleMessage(msg)) {
                    return;
                }
            }
            /**
             *嗯哼,没有传callback的话,那就走Handler的handleMessage()方法渠道咯
             *这也正是我们Demo所走的渠道,终于等到你,还好我没放弃,额额额...
             */
            handleMessage(msg);
        }
    }
小结:
"Looper.loop()"依赖两个for循环来维持消息轮询和分发,外环重复着三大任务:1.获取消息(queue.next())。2.分发消息(msg.target.dispatchMessage(msg))。3.回收消息(msg.recycleUnchecked())。
外环由msg==null条件成立而终止,为了让轮询一直维持下去,queue.next()作为内环既要承担这个任务,也要筛选msg提供给外环分发:1.有合适的msg则返回给外环。2.有消息但没到分发时间点,则阻塞线程,最长阻塞nextPollTimeoutMillis毫秒唤醒,期间可能被一些因素唤醒,如有新消息进入队列。3.无消息,即mMessages==null,则一直阻塞线程,期间可能被一些因素唤醒,如有新消息进入队列。4.如果消息队列退出,即mQuitting==true,则返回null,此时外环因msg==null而终止。
可能还有人在疑问:哪里能看得出handleMessage()已经切换到目标线程了?这个问题我还真被人问过,这里顺便回答一下:因为"handleMessage()"在"dispatchMessage()"下执行,而"dispatchMessage()"又在"loop()"下执行,"loop()"本身就运行在目标线程,这样够清晰了吗?嗯?
至此,关于Handler机制的分析就告一段落了,写作期间因为各种原因中断了很多次,也隔了很久,导致思路对接不通,不清晰,望请原谅,后期会不断优化更新~~


暂无评论内容